Team Excess Boost | Home My Mods Tweaks Team's Mods Contact Me Links Join Team Excess Boost Graphics New Forum Project Modifiers Downloads
Altezza/Euro taillights | Neon Under Glow | LED Lights | Carbon Fiber Hood | Spoilers | N2O Bottles | Decals/Graphics | Types of Paints/Painting | Widebodies/Scoops | Clear Hoods | Targa Tops/Convertibles | Window Tinting | How to use Bondo (Tutorial) | TV/Laptops | DVD Players/PS2/ X-BOX | Custom Body Kits | Subs/Amps | Right Hand Drive Conversion | License Plates | Turbo Kits | Working Doors (Tutorial)

LED Lights
CAUTION: Please read all instructions before starting this project.
Materials:
Two red 3 mm LED's
Two white/amber/blue LED's
Power Drill
2 mm Drill Bit
Soldering Gun or Soldering Pencil
Solder
Instructions:
<First you need to purchase red and white (or the color you prefer, amber/yellow works to) 3 mm or smaller LED's
2)Take the front part of the body kit off your modifier and/or take out your rear lights. NOTE: The front lights work best with the Integra. Also with the Integra only take out the inner lights.
3) Now find a 2 mm drill bit (NOTE: The drill bit size depends on the size LED's you bought. If you bought a light bigger than 3 mm then you need a drill bit that is 1 mm smaller than your LED's, Ex: LED 4 mm then use a 3 mm drill)
Front Light Instructions:
|
If you have a Integra drill a hole SLOWLY where the light used to be. Civic, Eclipse, Accord, etc. drill a hole SLOWLY where the hole that holds in the light is. NOTE: By doing that the light that came with the mod not the LED will have to be glued on at a later time. Make the hole bigger until the LED fits in the hole SNUGLY, to do this slowly make the hole bigger by taking the drill bit and slowly twist the bit BY HAND. Take the bit and wiggle it JUST A LITTLE BIT while your twisting it. Take the bit out every rotation (if your twisting the drill bit) and check to see if the LED fits snugly.
|
|
Rear Light Instructions:
|
For the back you will drill a 2 mm hole by using a 2 mm drill bit. Using a power drill SLOWLY drill a hole in between the two holes that hold the lights in. Then check to see if the LED fits SNUGLY in the hole. If not then SLOWLY twist and wiggle the drill bit by hand until the LED fits in snugly. Take the drill bit out of the hole about every rotation and check to see if the LED fits in snugly.
|
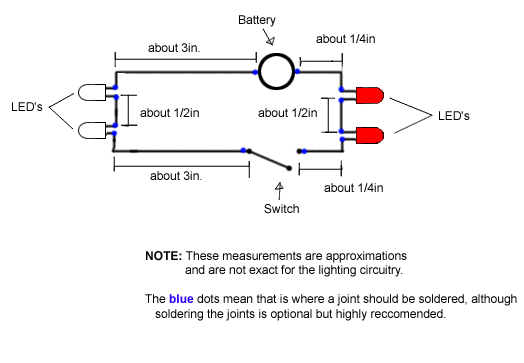
4)Now you have to make an electrical circuit for the lights to work. An electrical circuit consists of a source (in this case the battery), a switch, and a consumer (the LED's). Soldering the joints is HIGHLY recommended. Solder the LED's to the wires, the length of these wires should be about 3 1/2 inches. Next solder the other side of the LED to a wire about a 1/2 inch then solder the other end of the wire to the other end of the LED. Next solder the other side of that LED to another 3 1/2 wire, then solder the other end of the wire to a switch and battery holder then attach the other LED's to the wires. Somewhere along the wires there needs to be a switch and a battery holder with battery. For help view schematic below.
5)Now test make sure the LED's work before you go any further. If the LED's do not light up, the problem could be one of the following things:
a)The current is not flowing properly do to a break in the connection.
b)The current will not flow due to a negative facing a negative, such as the negative side of the LED is connected to another negative side of an LED or connected to the negative part of a battery. Vis-a-versa positive to a positive. NOTE: The negative side of the LED has a flat spot on it.
c)The battery is dead.
6)Now that the circuit is complete and the LED's are working it is time for installation. Now place the LED's in the holes that you made and make sure they fit snug if they don't then glue them in. Now just route you wire through the interior and put the switch and battery somewhere convenient and once again test the lights. Now you're done making realistic working lights and now show them off.
7)If your lights do work please send pictures of you lights on, click on Contact Me to send me pictures of your mod.